Networking HDS Models with NMEA2000
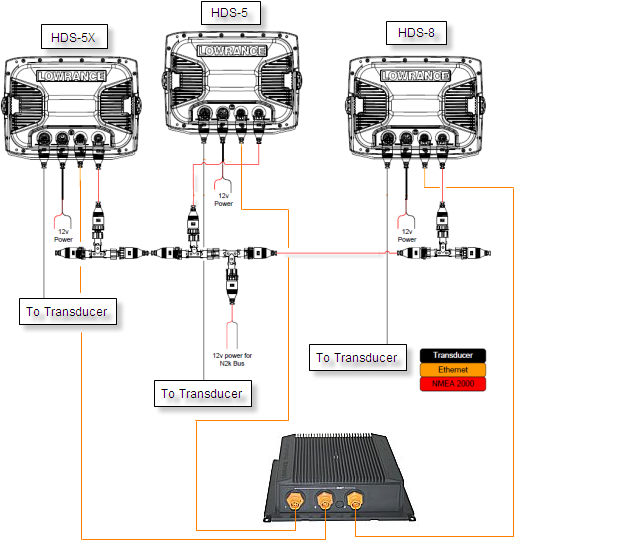
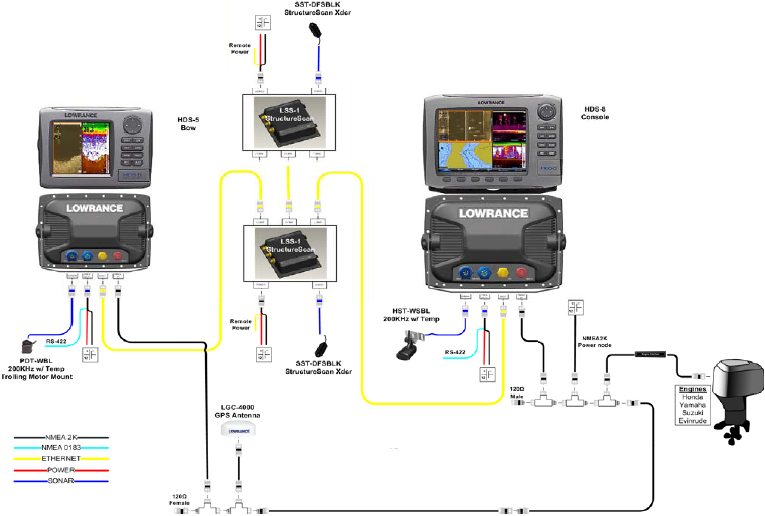
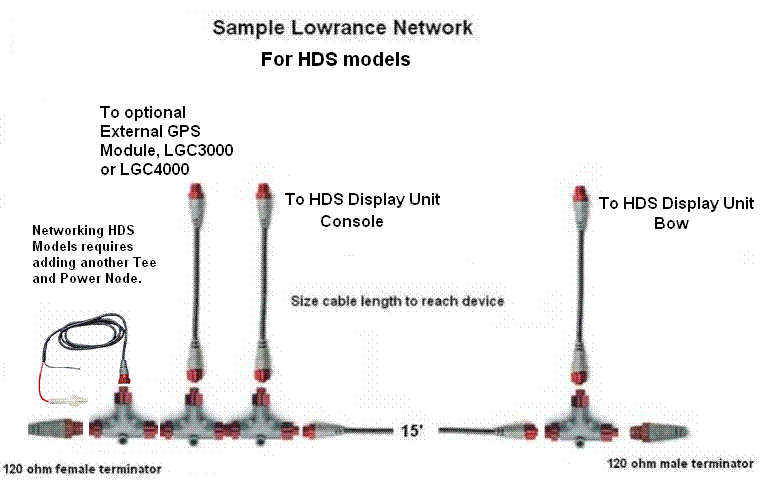
The Diagram below shows adding an external antenna, which is optional. If you are not hooking up an external antenna get rid of the extra Tee in the diagram.
Please note if you are only interested in waypoint sharing all you need to do is connect the two HDS units with an Ethernet cable. No NMEA Network is required unless you are using network sensors like temperature, fuel, interface cables or an external gps module.
The NMEA Network is totally expandable, just remove the terminator, add a Tee to plug in your new sensor and replace the terminator back on the new end. It's that easy!
Two HDS units Networked
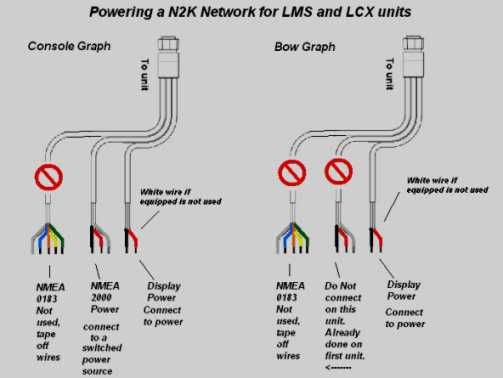
* if you are still using an older LMS or LCX unit which is networked to an HDS unit it can still power the nmea network through its power cable. (HDS units can not do this) If you are switching to all HDS units you have to buy the NMEA Power node to power the network, shown in the diagram below
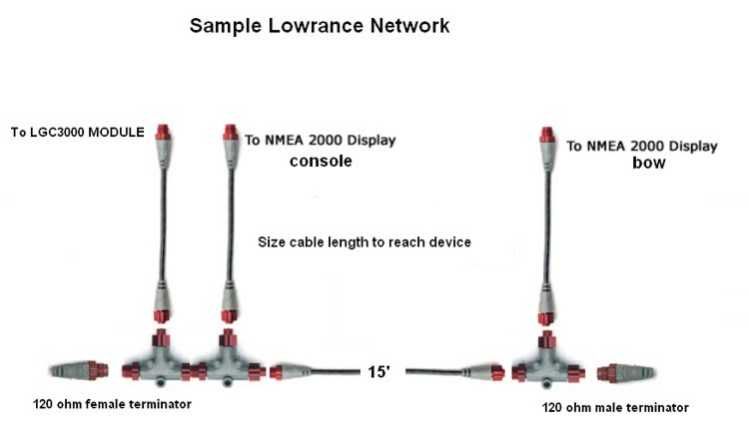
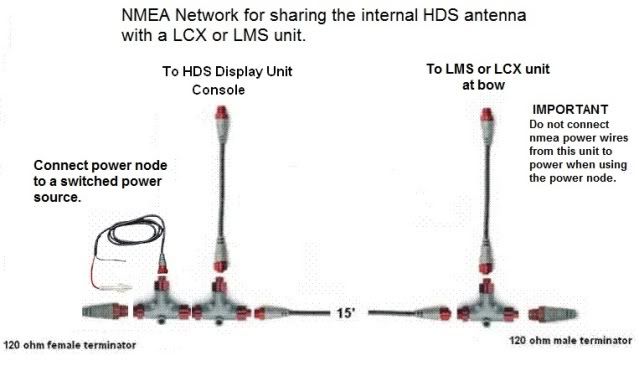
Some boats come pre-rigged withe NMEA2000 network backbone from the boat manufacturer and may use a Power Node to supply power the network. This Power Node is hooked directly into a Tee in the network bus. If your boat has one of these on the network DO NOT power the NMEA power wires from either graph (LCX and LMS). It is already done. Powering it twice will cause damage to the Module
Parts needed to network two HDS Models:
1) NMEA Starter kit: N2K-EXP-RD-2 (#124-69)
kit includes: Includes 2 terminating resistors (TR-120M-RD, TR-120F-RD),
two T-connectors (N2K-T-RD), one 2 ft extension cable (N2KEXT-2RD),
and one 15 ft extension cable (N2KEXT-15RD), and a power node (N2K-PWR-RD).
$51.99*
1) T connector, N2K-T-RD #119-79 $14.99
***Lowrance Reset Procedures***
The reset procedures below work with most newer LMS units, also with LCX and HDS units. If you want a pdf with reset procedures for all models go to Lowrance website and type in Lowrance Resets in the support page self help search field.
A reset usually clears up missing pages and menu items, it reorganizes the software when a problem occurs. It may correct gps connectivity problems as well as transducer problems. Always try the soft reset first and see if your problems are corrected before moving on to the hard reset.
Always shut down the unit with its own power button and never by unplugging it or disconnecting the power supply from the battery. This causes problems and is one of the main reasons resets are needed.
******Soft Reset****
Power unit down, press pages key and power key, hold keys until USA map appears. This will not delete waypoints or other user saved data.
******Hard Reset*****
This method will delete waypoints and trails so be sure to back them up first unless you have no choice.
Shut unit off, press Zoom in, Zoom out, and the power key, hold keys until USA map appears. Unit will reset to factory default, you will need to allow time for unit to reinitialize gps position. This may take up to a few minutes on the first gps position lock.
-------------------------
Transferring Waypoints from HDS to Endura.
with pic's when click on the link.
http://www.lowrance.com/upload...a.pdfStep 1: Insert a microSD card into a standard SD adapter, then place adapter into the card slot on your HDS unit. Press the Pages key and scroll to the utilities page, select Files and press Enter.
Step 3: Select the output format as GPX (GPS Exchange), this is the format that your Endura uses for all waypoints, trails, and routes.
Note: Endura units can only import .gpx files that are no larger than 3 MB each. To check the size of your data file on you HDS, highlight Waypoints, Routes and Trails and press menu and select details.
09/03/2010
Step 2: Highlight Waypoints, Routes and Trails and press Menu and select export.
Step 4: Select the memory card destination for the GPX file.
Step 5: Remove the microSD card from the SD adapter. Insert the microSD card with the HDS gpx file on it into the card slot on the bottom of the Endura unit.
Step 6:
The Endura will ask Import GPX from Card? Select yes. The Endura will then process the GPX file and add it to your onboard waypoint and trails list.* This may take a few minutes to process. Once this is complete, you can return your microSD card and SD adapter back to your HDS unit if you wish.
*The Endura will need to be power cycled off then back on for the waypoint data to appear in the unit.
-----------------------
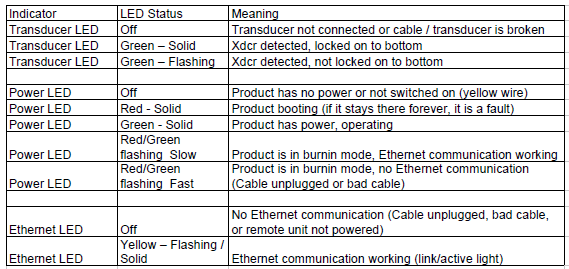
LSS-1 Light Codes
-------------------------
Elite 5 series info:
Saving wpts and Transfer wpts on Elite 5 series.
1) From the Chart or Steer page:
a. Press the menu key
b. Scroll to Waypoints, Routes, Trails
c. Press Enter
d. Press Menu
e. Select Save to card
or Load from card
(depending on desired function)
f. Press Enter
g. For Save to card
i. User can rename the file or go with the default Data
ii. Select version
1. 3.0 includes waypoint depth, this is not compatible with GDM6 or MapCreate.
2. 2.0 does not include depth.
iii. Select save
iv. Press Enter.
h. For Load from card
i. Select file from Card menu
ii. Press Enter
2) From any page:
a. Press the Menu key twice
b. Select Chart
c. Scroll to Waypoints, Routes, Trails
d. Press Enter
e. Follow steps d-h above.
Screen shots on Elite 5:
The latest update, 2.8, added screen shot capability. (Insert writable microSD card and press power then zoom +.)

